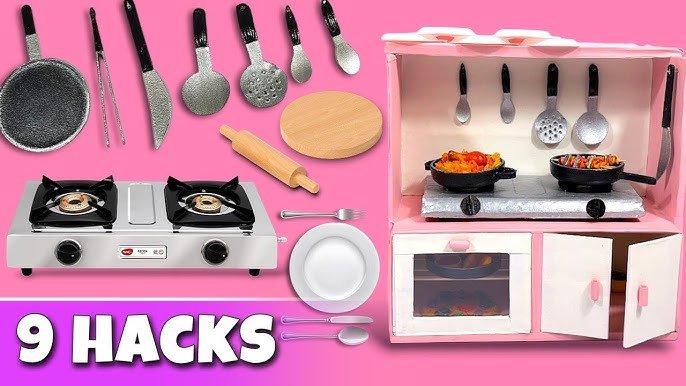
Have you ever thought about creating a toy kitchen set that sparks your child’s imagination and creativity? Building your own toy kitchen isn’t just fun—it’s a chance to give your little one a special place to play and learn.
Imagine the joy on their face as they cook up make-believe meals in a kitchen you built with your own hands. In this guide, you’ll discover simple steps and tips to craft a toy kitchen set that fits your space, budget, and style perfectly.
Ready to bring this exciting project to life? Let’s get started!
Choosing Materials
Choosing sturdy wood or safe plastic ensures the toy kitchen lasts long and stays child-friendly. Selecting materials that are easy to clean helps keep the play area neat.
Choosing the right materials for building a toy kitchen set is crucial for both durability and safety. You want a kitchen set that can withstand endless hours of play while being safe for your little ones. Let’s explore some material options and considerations to help you make the best choice for your DIY project.Wood Vs. Plastic Options
Wooden toy kitchen sets are timeless and offer a sturdy build. They provide a natural look that can complement any playroom decor. Additionally, wood is eco-friendly and can be sanded down for a smooth finish. However, it might be heavier and require more tools to work with. Plastic, on the other hand, is lightweight and easy to mold into different shapes. It’s often less expensive and can be easier to clean. But it may not be as durable as wood, and over time, it might show signs of wear and tear. Which material aligns with your DIY skills and budget? Consider the aesthetic and practical aspects before making your decision.Safe Paints And Finishes
Safety is paramount when building a toy kitchen set. Choose non-toxic paints and finishes that are safe for children. Water-based paints are a great option since they are low in volatile organic compounds (VOCs). A personal tip: Look for paints with the ASTM D-4236 certification, which indicates they’ve been evaluated for safety. Don’t forget to apply a protective finish to seal the paint and prevent chipping. Ensuring the materials are safe can give you peace of mind while your child enjoys their playtime.Essential Tools Needed
Building a toy kitchen set requires some basic tools. Make sure you have a reliable saw for cutting your chosen material, whether it’s wood or plastic. A drill will be invaluable for assembling different parts securely. A measuring tape is crucial to ensure all pieces fit together perfectly. Keep a sanding block handy for smoothing out rough edges, especially if you’re working with wood. Having these tools ready will make the assembly process smoother and more enjoyable. Do you have everything you need for your DIY adventure?
Credit: www.youtube.com
Planning Your Design
Planning your toy kitchen design sets the foundation for a fun and functional play area. Careful thought helps create a safe and enjoyable space for children. A good plan saves time and materials during building. Focus on size, features, and storage to suit your child’s needs.
Measuring And Sketching
Start by measuring the space where the kitchen will go. Note the height, width, and depth limits. Sketch a rough layout on paper. Include shapes for the stove, sink, and counters. Use simple lines and boxes to show parts clearly. This visual guide helps avoid mistakes and fits the kitchen perfectly.
Selecting Functional Features
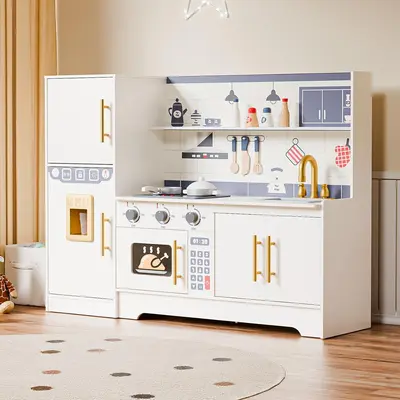
Choose features that children will use often and enjoy. Think about adding a pretend stove, sink, and oven doors. Consider knobs that turn and shelves that open. Keep parts safe, with no sharp edges or small pieces. Adding interactive elements makes playtime more exciting and realistic.
Incorporating Storage Spaces
Plan storage for toy pots, pans, and utensils. Use shelves, hooks, or small cabinets. Storage keeps the play area tidy and organized. Make sure storage is easy to reach for children. Open shelves work well for quick access and visibility. Good storage extends playtime and teaches kids to clean up.
Cutting And Assembling
Cutting and assembling are key parts of building a toy kitchen set. Precise cutting ensures all pieces fit well. Careful assembling makes the structure strong and safe for children. This section guides you through cutting wood pieces, joining techniques, and adding shelves and doors.
Cutting Wood Pieces
Start by measuring each piece carefully. Mark the wood with a pencil for clear cutting lines. Use a saw suitable for your wood type, like a jigsaw or handsaw. Cut slowly to avoid splintering the edges. Sand the edges smooth to prevent any rough spots. Organize the pieces by size and shape after cutting.
Joining Techniques
Choose joining methods that make the kitchen sturdy. Wood glue works well for small joints. Use clamps to hold pieces together while drying. Screws or nails add extra strength, especially for heavy parts. Drill pilot holes first to avoid splitting the wood. Countersink screws for a neat finish and safety.
Adding Shelves And Doors
Measure shelf spaces inside the frame before installation. Attach shelf supports evenly on both sides for balance. Slide shelves into place and secure with screws or nails. For doors, use small hinges attached to the frame and door edges. Check that doors open smoothly without gaps. Add handles or knobs for easy use and a fun look.
Painting And Decorating
Painting and decorating your toy kitchen set brings it to life and makes it truly special. This stage lets you add personality and charm that will captivate your child’s imagination. How you choose colors, apply paint, and add details can transform simple wood into a vibrant play space.
Choosing Colors
Pick colors that excite and inspire. Bright reds, sunny yellows, and fresh greens often work well for toy kitchens because they feel cheerful and inviting. Think about your child’s favorite colors or even the theme of their playroom to keep everything cohesive.
Consider using a combination of bold and soft tones to create depth. For example, a soft pastel base with colorful accents on knobs and doors can look modern and fun. What color combinations would make your kitchen set stand out on the playroom shelf?
Applying Paint Safely
Use non-toxic, child-safe paints to keep your kitchen set safe for little hands. Water-based acrylic paints dry quickly and are easy to clean up, making them perfect for this project. Always work in a well-ventilated area to avoid inhaling fumes.
Apply thin, even coats to avoid drips and uneven surfaces. Let each coat dry completely before adding the next to achieve a smooth finish. Don’t rush—patience here results in a more durable and attractive kitchen set.
Personalizing With Details
Adding small details turns your kitchen set from ordinary to extraordinary. Think about painting little patterns like polka dots on the cupboard doors or stripes on the countertop edges. These touches make the set feel hand-crafted and unique.
You can also use stickers or decals for quick personalization, but painting details gives a more lasting effect. Why not add your child’s initials or a tiny chalkboard section for menu writing? These ideas can spark creativity during play and make the kitchen truly their own.
Adding Accessories
Adding accessories to your toy kitchen set brings it to life. Accessories make playtime more fun and realistic. They encourage creativity and role-playing. Simple additions can turn a basic kitchen into a mini culinary world.
Diy Kitchen Utensils
Create utensils from everyday materials. Use wooden spoons, sticks, and small containers. Paint them with bright colors for a cheerful look. Craft a spatula from cardboard or felt. Glue buttons or beads to make knobs for pots. These homemade tools are safe and unique.
Creating Play Food Items
Make play food using felt, foam, or paper. Cut shapes like fruits, vegetables, or bread slices. Use markers to add details like seeds or crusts. Stuff felt pieces lightly to give a 3D effect. Attach magnets or Velcro for easy handling. This food looks fun and invites imaginative cooking.
Incorporating Interactive Elements
Add buttons, knobs, or switches that click or turn. Use old remote buttons or small bells for sounds. Attach a chalkboard or whiteboard for menus and recipes. Install a small mirror as a pretend oven window. These details make the kitchen interactive and engaging.

Credit: www.youtube.com
Ensuring Safety
Safety is the top priority when building a toy kitchen set. Children will use it daily, so every detail must be safe and secure. Careful planning helps prevent accidents and ensures long-lasting fun.
Sanding Edges Smoothly
Sharp edges can cause cuts or splinters. Sand every corner and edge until smooth. Use fine-grit sandpaper to create a soft finish. Check all surfaces with your hand to feel for rough spots. Sand again if anything feels sharp.
Using Non-toxic Materials
Choose paints and finishes that are safe for children. Look for labels that say “non-toxic” and “child-safe.” Avoid materials with strong odors or harmful chemicals. Natural wood and water-based paints work best. These keep the kitchen set safe even if kids touch or lick it.
Sturdy Construction Tips
Make sure all parts are firmly attached and stable. Use screws instead of nails for stronger joints. Test the kitchen set by gently shaking it to check stability. Avoid small parts that can break off easily. Strong construction prevents tipping and keeps children safe while playing.
Encouraging Creative Play
Encouraging creative play helps children explore ideas and express themselves. A toy kitchen set becomes a space for imagination and learning. It invites kids to invent stories and try new roles. This kind of play boosts problem-solving and social skills. Small changes can keep the play fresh and exciting. Let’s explore ways to inspire creativity around a toy kitchen set.
Setting Up Play Scenarios
Create simple storylines for children to act out. Examples include running a restaurant or cooking for a family picnic. Use props like menus, play food, and utensils. Change the themes often to keep interest high. Scenarios help kids think and plan their actions. They learn cause and effect naturally. Encourage kids to add their own ideas to the stories.
Inviting Social Interaction
Invite siblings or friends to join the play. Share roles like chef, waiter, or customer. Social play builds communication and cooperation skills. It teaches sharing and patience too. Group play often sparks new ideas and fun challenges. Adults can join to guide and expand the play experience. Praise teamwork and creativity to motivate kids.
Rotating Accessories For Variety
Change the toys and tools regularly. Swap in new play food, pots, and pans. Introduce different kitchen gadgets or costumes. Variety keeps the play interesting and inspiring. It encourages children to try new roles and stories. Store unused items out of sight to surprise kids later. Rotating accessories also helps develop fine motor skills and imagination.
Credit: www.tiktok.com
Frequently Asked Questions
What Materials Are Best For Building A Toy Kitchen Set?
Wood is the most durable and safe material for toy kitchens. It’s eco-friendly and easy to paint. Avoid toxic plastics to ensure child safety. Using non-toxic paint and smooth finishes enhances durability and appearance. Choose materials that are lightweight yet sturdy for easy handling.
How Do I Ensure Safety In A Diy Toy Kitchen?
Use smooth edges and non-toxic paints to prevent injuries. Avoid small parts that can be choking hazards. Secure all pieces tightly to prevent collapse. Test stability regularly and supervise children during play to maintain safety standards.
What Tools Are Essential For Making A Toy Kitchen Set?
Basic tools include a saw, drill, screwdriver, and measuring tape. Sandpaper helps smooth edges for safety. Paintbrushes are needed for finishing touches. Having clamps and a hammer can also make assembly easier and more precise.
How Can I Customize A Toy Kitchen For Kids?
Add removable knobs, magnetic doors, and chalkboard surfaces for creativity. Use bright, engaging colors to attract kids. Include storage compartments for utensils and pretend food. Personalize with child’s name or favorite themes to enhance playtime experience.
Conclusion
Building a toy kitchen set brings fun and learning together. It sparks creativity and helps develop fine motor skills. You can choose simple materials and tools to start. Follow clear steps and stay patient through the process. Kids love playing with something made just for them.
This project also saves money compared to buying ready-made sets. Enjoy the time spent crafting and sharing with your child. A homemade kitchen set becomes a cherished part of playtime. Keep experimenting and adding new features as you go.




