Do you want to create a fun and creative space for your toy cars? Building a toy garage for cars is easier than you think, and it can turn playtime into an exciting adventure.
Imagine your kids’ eyes lighting up as they park their favorite cars in a garage you made just for them. In this guide, you’ll discover simple steps to build a sturdy and cool toy garage that fits your space and style.
Ready to bring your toy cars a new home they’ll love? Let’s get started!
Materials Needed
Building a toy garage for cars is a fun and creative project. The right materials make the process smooth and enjoyable. Gather simple and safe items that fit your design and budget.
Choosing durable and easy-to-handle materials ensures the garage lasts long. Below are the essential materials needed for this project.
Wood Or Cardboard
- Wood boards like plywood or MDF offer sturdy structure
- Cardboard sheets are lightweight and easy to cut
- Choose thickness based on garage size and strength needed
Cutting Tools
- Craft knife or box cutter for cardboard
- Handsaw or jigsaw for wood pieces
- Sandpaper to smooth edges
Adhesives
- Wood glue for wooden parts
- Hot glue gun for quick bonding
- Tape for temporary holds
Paints And Brushes
- Non-toxic acrylic paint for bright colors
- Brushes of different sizes for details
- Sealant to protect paintwork
Additional Accessories
- Small hooks or clips for car storage
- Plastic or wooden dowels for ramps
- Stickers or decals for decoration

Credit: www.amazon.com
Choosing The Right Design
Choosing the right design for your toy garage is essential to make it both functional and fun. The design impacts how much space you need, the look of the garage, and how your child will interact with it. Thinking carefully about size and style helps you create a toy garage that fits perfectly in your home and sparks imagination.
Size Considerations
Start by measuring the space where the garage will go. Is it a corner of the playroom, a shelf, or the floor? Knowing the available space helps you decide the garage’s dimensions.
Think about how many cars you want to fit inside. A small garage with two or three spots works well for compact collections. But if your child has many cars, aim for a larger design with multiple levels or bays.
Also, consider the height and accessibility. Will your child reach the top level easily? Adding ramps or open sides can make play smoother. Have you thought about how the garage size will grow with your child’s toy collection?
Styling Options
Styling gives your toy garage personality and makes it exciting. You can choose a classic look with bold colors or go for a modern style using sleek lines and neutral tones.
Adding details like windows, doors, or signs makes the garage feel real. You might even paint numbers on parking spots or add tiny traffic cones for extra fun. What style matches your child’s favorite car themes or your home decor?
Materials also affect the style. Wood offers a warm, timeless feel, while plastic can be bright and easy to clean. Combining textures can bring your design to life and keep your child engaged for hours.
Preparing The Workspace
Preparing your workspace is a crucial step before you start building a toy garage for cars. A well-organized area helps you stay focused and makes the entire process smoother. It also prevents accidents and keeps your tools and materials within easy reach.
Tools Required
Gather all the tools you will need before starting. This saves you from interrupting your work to find something important.
- Screwdriver set:Essential for assembling parts.
- Measuring tape:Helps ensure accuracy in dimensions.
- Wood glue:Adds extra strength to joints.
- Sandpaper:Smooths rough edges for a polished finish.
- Handsaw or jigsaw:Needed to cut pieces to size.
- Clamps:Hold parts steady while glue dries.
- Pencil and ruler:For marking measurements clearly.
Having these tools at hand will keep you in the flow and reduce frustration. Did you ever stop in the middle of a project just to hunt for a screwdriver? Avoid that by prepping your tools now.
Safety Tips
Your workspace should be safe to avoid injuries. Keep it clean and clutter-free to prevent tripping or knocking over materials.
- Wear safety glasses:Protect your eyes from dust and sharp objects.
- Use gloves:Shield your hands from splinters and cuts.
- Work in a well-ventilated area:Especially important if you use glue or paint.
- Keep children and pets away:They might get hurt or disrupt your work.
- Secure loose clothing and tie back long hair:Prevents them from catching on tools.
Have you ever underestimated the importance of wearing safety gear? You might think it’s overkill, but a small precaution can save you from big trouble. Protect yourself while enjoying your creative project.
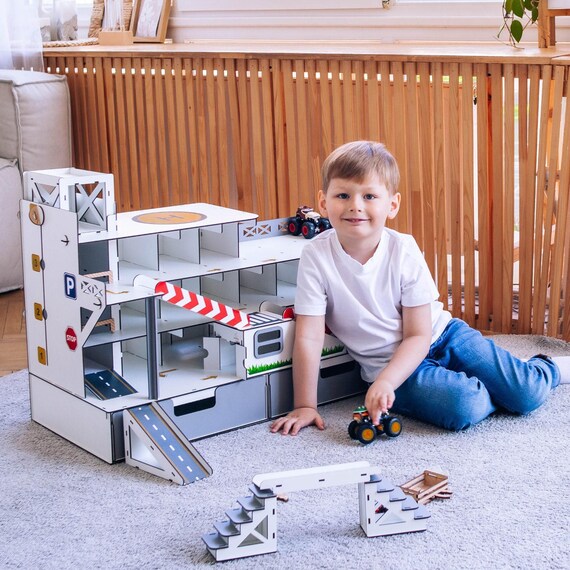
Credit: www.etsy.com
Constructing The Base
Constructing the base of your toy garage is where the project really takes shape. This foundation needs to be sturdy enough to support the entire structure and the weight of the cars that will rest on it. Taking your time here pays off by ensuring your toy garage lasts through countless play sessions.
Cutting The Wood
Start with selecting wood that is smooth and free of splinters for safety. Plywood or pine boards work well for this project. Measure twice before you cut to avoid wasting materials or ending up with uneven pieces.
Use a saw that you’re comfortable handling—whether that’s a handsaw or an electric saw. Keep your cuts straight and clean to make assembly easier later on. If you’re new to cutting wood, practice on scrap pieces to build confidence.
Assembling The Frame
Lay out your cut pieces on a flat surface to visualize how they fit together. Use wood glue along the edges before screwing the parts together for added strength. Clamps can hold the pieces in place while the glue dries, making assembly smoother.
Double-check that the frame is square by measuring diagonally from corner to corner. Unequal measurements mean you need to adjust before moving forward. A solid, square frame sets the stage for a balanced and durable toy garage.
Building The Walls
Building the walls of your toy garage sets the foundation for its overall look and sturdiness. This step requires careful attention to how you connect each part to ensure the structure is solid enough to handle playtime. Think about the size and shape of the walls before starting, as this affects how your garage will function and look.
Attaching Panels
Start by choosing lightweight but sturdy materials like foam board, plywood, or thick cardboard for the walls. Cut panels to the exact size you want your garage walls to be. Use wood glue or strong tape to join the panels together at the edges.
Secure the joints with small nails or screws if you’re using wood. Make sure the corners are square to keep the walls stable and straight. Let the glue dry completely before moving on to avoid any shifting or weak spots.
Creating Windows And Doors
Windows and doors give your toy garage character and make it more fun to play with. Mark the size and position of each opening on the wall panels before cutting. Use a craft knife or small saw to carefully cut out the shapes.
You can add clear plastic sheets behind the windows to mimic glass. For doors, consider making them open and close by attaching them with small hinges or using Velcro strips. This little feature makes the garage feel more realistic and interactive.
Adding The Roof
Adding the roof to your toy garage gives it a complete and realistic look. It also protects the cars inside from dust and damage. A well-built roof adds stability to the entire structure. Focus on using strong materials and securing them properly. This ensures the roof stays in place during playtime. Let’s explore the best materials and ways to fix the roof firmly.
Choosing Materials
Select materials that are light but sturdy. Wood sheets, cardboard, or plastic panels work well. Wooden planks give a natural look and last long. Cardboard is easy to cut and shape but less durable. Plastic sheets offer weather resistance and smooth surfaces. Pick a material that fits your garage size and design. Consider weight too, so the roof stays steady on the base.
Securing The Structure
Attach the roof firmly to the garage walls. Use small nails or strong glue for wood. Double-sided tape or hot glue works well for cardboard or plastic. Check all corners and edges to avoid gaps. Reinforce with extra strips underneath for added support. Make sure the roof does not wobble or lift during use. Test by gently pressing on the top to confirm stability.
Painting And Decorating
Painting and decorating bring your toy garage to life. This step lets you add personality and style. Bright colors and fun designs make the garage exciting for playtime. It also protects the wood or material you used. Simple techniques create a neat, durable finish that lasts.
Color Choices
Pick colors that match your child’s favorite cars or room decor. Bold colors like red, blue, and yellow work well. Soft pastels create a calm, friendly look. Use paint that is safe and easy to clean. Matte paint hides scratches better than glossy. Try mixing colors to create stripes or patterns. Keep some areas neutral to balance bright colors.
Custom Decals
Custom decals add unique details to your garage. Print or buy stickers of car logos, numbers, or signs. Place decals on doors, walls, or ramps for a cool effect. Use waterproof decals to avoid peeling during play. You can also cut shapes from colored tape. This lets you add windows, signs, or road markings. Decals make the garage more fun and realistic.

Credit: www.instagram.com
Final Touches
Final touches give the toy garage a polished, complete look. These small details improve playtime and make the garage more fun to use. Pay close attention to how ramps and interior spaces come together.
Installing Ramps
Ramps connect different levels of the garage. Choose sturdy materials like wood or thick cardboard for support. Cut ramps at a gentle angle for easy car movement. Secure ramps with glue or screws to avoid wobbling.
Place ramps where cars can easily drive up and down. Test the slope with toy cars to ensure smooth rides. Add small side rails for safety and to keep cars on track.
Organizing Interior
Organize the garage interior to keep it tidy and fun. Use small boxes or containers for storing car accessories. Label each container with simple words or pictures.
Create parking spots using tape or paint. Mark clear lines for cars to park neatly. Add shelves or hooks on walls for helmets or tools.
Keep the space open enough for easy access. A well-organized garage invites longer, more creative play sessions.
Maintenance Tips
Maintaining your toy garage ensures it stays fun and safe for play. Regular care prevents damage and keeps the structure sturdy. Simple cleaning and timely repairs extend its life.
Cleaning Advice
Dust and dirt can build up on your toy garage quickly. Use a soft cloth or brush to wipe all surfaces gently. For plastic parts, a damp cloth with mild soap works well. Avoid soaking wooden pieces to prevent warping.
Keep small crevices free of debris. Use cotton swabs or a soft brush to reach tight spots. Clean regularly to avoid sticky residue from spills or snacks. Dry all parts completely before storing or playing again.
Repair Suggestions
Check your toy garage often for loose or broken parts. Tighten screws and bolts to keep the structure safe. Use child-safe glue for small cracks or loose decorations.
Replace damaged pieces promptly to avoid further problems. Use sandpaper to smooth rough edges on wooden parts. Keep spare screws and small tools handy for quick fixes.
Frequently Asked Questions
What Materials Do I Need To Build A Toy Garage?
You need wood or sturdy cardboard, glue or nails, paint, and small tools. Optional items include stickers and toy ramps.
How Long Does It Take To Build A Toy Garage?
Building a simple toy garage usually takes 2-4 hours, depending on design complexity and drying time for paint.
Can I Customize The Toy Garage Design?
Yes, customize size, colors, and features like ramps or doors. Personalizing makes it more fun and unique.
Is It Safe For Children To Play With?
Yes, if you use non-toxic paint and smooth edges. Avoid small parts that could be choking hazards.
Conclusion
Building a toy garage for cars can be fun and simple. Use basic materials and follow clear steps. Kids enjoy parking and playing with their cars inside. It also helps keep toys organized and easy to find. Take your time and make it safe for children.
You will feel proud of the finished garage. This project brings joy and creativity to playtime. Try it and see how much fun it can be!




