Have you ever wondered how to make a toy car that runs on sunlight? Imagine building your very own solar powered toy car that moves without batteries or fuel.
It’s easier than you think, and it’s a fun way to learn about clean energy and technology. In this guide, you’ll discover simple steps to create your own solar car using basic materials. Ready to turn sunshine into motion? Let’s get started!
Materials Needed
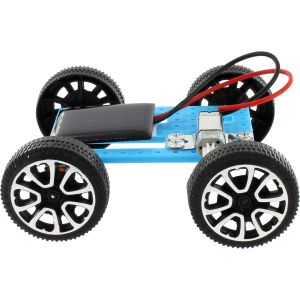
A small solar panel, electric motor, toy car parts, wires, and a battery are essential for building a solar powered toy car. Simple tools like scissors and tape will also help assemble the pieces easily.
Building a solar-powered toy car can be a fun and educational project, teaching you about renewable energy and mechanics. Before you start assembling, it’s crucial to gather the right materials. Understanding what you need and why can help you create a car that runs smoothly on solar power, offering both a rewarding experience and a toy that can inspire future projects. Let’s dive into the materials you’ll need for this exciting project.Solar Panel
The solar panel is the heart of your toy car, converting sunlight into electricity. Look for a small, lightweight panel with enough power output to drive the motors. You can find these panels online or at electronics stores, often specially designed for hobby projects. Consider the size and efficiency—will it fit on your car and provide sufficient power?Motors And Wheels
Selecting the right motors and wheels is crucial for your car’s movement. Small DC motors are perfect for toy cars, offering the power needed to turn the wheels. Choose wheels that match the size of your chassis and motor axles. You can find these in hobby shops or online marketplaces. Will your wheels grip the surface well enough for smooth travel?Chassis Options
The chassis is the backbone of your car, holding all components together. You can opt for simple materials like cardboard or plastic, or use a pre-made chassis kit for ease. Ensure it’s sturdy and has enough space to accommodate the solar panel, motor, and wheels. Think about weight and balance—how will your chassis affect the car’s speed and stability?Connecting Wires
Connecting wires are essential for linking the solar panel to the motor. Use flexible, insulated wires that can easily be manipulated to fit your design. The length of the wires should allow for smooth connections without excess slack. Are your wires durable enough to handle the current and movement?Tools Required
A few basic tools will make the assembly process smoother. You’ll need a soldering iron for secure connections, a screwdriver for assembling parts, and perhaps a small drill for making precise holes. These tools are often found in standard household toolkits. Are you prepared with the tools to bring your solar toy car to life? By focusing on these materials, you’ll be well on your way to constructing a solar-powered toy car that’s not only functional but a testament to renewable energy innovation. Ready to embark on this creative journey?
Credit: www.youtube.com
Choosing The Right Solar Panel
Choosing the right solar panel is a crucial step in building your solar powered toy car. The panel you pick directly affects how fast and how far your car can run. Understanding the size, type, and source of your solar panel will help you make a smart choice that fits your project’s needs.
Panel Size And Power
The size of the solar panel matters because it determines how much sunlight it can capture. A larger panel usually produces more power but can add weight and bulk to your toy car. Think about balancing power and size—can your car handle a bigger panel without slowing down?
Power output is measured in volts and milliamps (mA). For a small toy car, a panel that generates around 5 volts and 100-200 mA is often enough. If you choose a panel with too little power, your car might move very slowly or stop when sunlight is weak.
Types Of Solar Cells
There are mainly three types of solar cells to consider: monocrystalline, polycrystalline, and thin-film. Monocrystalline cells are the most efficient but can be more expensive. Polycrystalline cells offer a good balance of cost and efficiency.
Thin-film panels are lightweight and flexible but usually provide less power. I once tested a thin-film panel on a toy car, and it struggled on cloudy days. So, ask yourself: do you need efficiency or flexibility more for your design?
Where To Buy
You can find solar panels at electronics stores, online marketplaces, and specialty hobby shops. Websites like Amazon and eBay offer a wide range of panels with detailed reviews that can help you decide. Local stores might allow you to see the panel before buying, which is a plus.
Look for kits specifically designed for educational or hobby projects. These kits often include mounting hardware and instructions, making your build easier. Have you checked if your local makerspace or school offers solar components? Sometimes they provide parts or even workshops to guide you.
Building The Car Base
Building the car base is the foundation of your solar powered toy car. This stage sets the shape and stability for the entire project. A strong and well-assembled base ensures your car will run smoothly and last longer.
Assembling The Chassis
Start by choosing a sturdy material for the chassis, such as lightweight wood or plastic. Cut the material into a rectangle about 8 to 10 inches long and 4 to 5 inches wide. This size works well for balancing the solar panel and motor later on.
Use glue or small screws to secure any additional support pieces underneath the main base. These supports help keep the chassis from bending when the car moves. Think about where the motor and battery will fit to avoid overcrowding the base.
Have you considered how the weight distribution will affect your car’s speed? Keeping the chassis light but strong makes a big difference in performance.
Attaching Wheels And Axles
Next, prepare the wheels and axles. You can use toy wheels or small plastic discs. Attach the axles—thin metal rods or stiff plastic sticks—to the chassis by creating small holes or using brackets.
Ensure the axles spin freely without wobbling. Tighten the attachments just enough to hold the wheels but allow smooth rotation. Test this by rolling the chassis on a flat surface before moving on.
Have you noticed how a slight tilt or misalignment can slow your car down? Double-checking the wheels’ alignment saves frustration later.
Wiring The Motor To The Solar Panel
Wiring the motor to the solar panel is a key step in building your solar powered toy car. This connection allows the energy from the sun to power the motor and make the car move. Proper wiring ensures efficient energy transfer and prevents damage to the components. Take care to handle the wires correctly and secure all connections firmly.
Connecting Wires Safely
Start by stripping a small part of the insulation from the ends of the wires. Use a wire stripper or scissors carefully. Connect one wire from the positive terminal of the solar panel to the positive terminal of the motor. Then, connect another wire from the negative terminal of the solar panel to the negative terminal of the motor.
Make sure the wires do not touch each other directly. Use electrical tape or small wire connectors to cover exposed wire parts. This prevents short circuits and keeps the connection safe. Keep the wires neat and avoid loose ends that might get caught in moving parts.
Testing The Circuit
Place the solar panel in direct sunlight or use a strong light source. Watch the motor carefully to see if it starts running. If the motor does not move, check the wire connections. Ensure the polarity is correct; the positive wire goes to positive, and negative to negative.
Use a multimeter to check voltage at the motor terminals if available. A low or zero reading means a wiring problem or weak solar panel output. Adjust or reconnect wires as needed. Once the motor runs smoothly, the circuit is ready for the next building steps.
Adding Decorative Elements
Adding decorative elements gives your solar powered toy car a unique and fun look. It makes the project more personal and enjoyable. You can use simple materials to transform the car’s appearance. Bright colors, cool stickers, and custom shapes can make your car stand out.
Painting And Stickers
Painting is a quick way to add color and style. Use acrylic paints for good coverage and fast drying. Choose colors that match your theme or favorite shades. Apply thin coats to avoid clumps and drips. Let each layer dry before adding the next one.
Stickers add detail without much effort. Find stickers with patterns, logos, or characters you like. Place them on flat areas for the best look. Clear tape can protect stickers from peeling off. This keeps the car looking fresh for longer.
Customizing The Car Design
Cut shapes from colored paper or foam and glue them on. Small parts like spoilers or flags add character. Use safe glue that dries clear to avoid mess. Try adding tiny details with markers or pens for extra flair.
Think about the car’s style. Is it a race car, a monster truck, or a futuristic vehicle? Change the shape of parts like windows or wheels using lightweight materials. This makes your solar car one-of-a-kind and fun to show off.

Credit: vxb.com
Testing And Troubleshooting
Testing and troubleshooting are essential to ensure your solar powered toy car works well. This process helps identify problems early and improves the car’s performance. Careful testing saves time and helps you learn more about how solar power works.
Running The Car In Sunlight
Place your toy car outside in direct sunlight. The solar panel should catch enough light to power the motor. Watch the wheels carefully as the car starts to move. Try different angles for the solar panel to get the best sunlight.
Test the car on flat, smooth surfaces to see how fast it can go. Note any slow or uneven movement. This helps to understand if the motor and wheels work properly. Run the car several times to be sure it runs consistently.
Fixing Common Issues
If the car does not move, check the solar panel connections first. Loose wires can stop power flow. Make sure all parts are tightly connected and clean. Dirt or dust on the solar panel can reduce sunlight absorption.
Look for stuck wheels or parts that don’t spin freely. Lubricate or adjust them to reduce friction. If the motor makes noise but the car does not move, the gears might be misaligned. Realign the gears carefully for smooth motion.
Sometimes weak sunlight affects performance. Try testing on a brighter day or closer to noon. If problems continue, test the solar panel with a multimeter. This will show if it produces enough voltage to run the motor.
Tips For Better Performance
Boosting your solar powered toy car’s performance makes it more fun to use. Small changes can make a big difference. Focus on how the solar panel catches sunlight and how well the motor works. These tips help your car run faster and longer.
Optimizing Solar Exposure
Place the solar panel where it gets the most sunlight. Keep it clean from dust and dirt. Tilt the panel to face the sun directly. Avoid shadows from trees or buildings. Use a larger solar panel if possible. Bright light helps the car move stronger and faster.
Improving Motor Efficiency
Choose a motor with low power use but good speed. Lubricate the motor’s moving parts to reduce friction. Check the gears and wheels for smooth movement. Tighten any loose parts to avoid energy loss. Use lightweight materials for the car to ease the motor’s load. Better motor care means longer and smoother rides.
Credit: www.xump.com
Frequently Asked Questions
What Materials Are Needed To Build A Solar Powered Toy Car?
You need a small solar panel, electric motor, wheels, chassis, wires, and a switch. These components help convert sunlight into motion efficiently.
How Does A Solar Powered Toy Car Work?
The solar panel captures sunlight and converts it into electrical energy. This energy powers the motor, which drives the wheels, moving the car forward.
Can Beginners Easily Build A Solar Powered Toy Car?
Yes, beginners can build it with basic tools and simple instructions. It’s a great project to learn about solar energy and electronics.
How Long Does A Solar Powered Toy Car Run?
The car runs as long as it receives enough sunlight. Battery-free models stop working indoors or under low light conditions.
Conclusion
Building a solar powered toy car is fun and educational. It teaches basic science and how solar energy works. You only need simple parts and a little patience. Watching your car move with sunlight feels rewarding. Try changing parts to see different results.
This project helps you learn and enjoy at the same time. Keep experimenting and have fun with solar power!