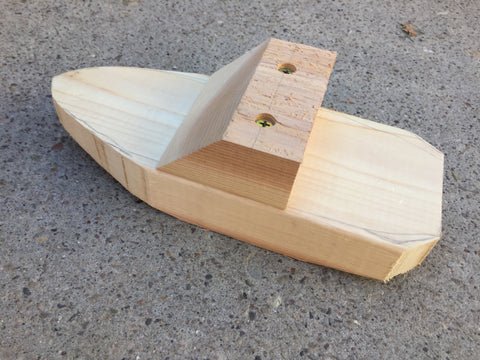
Have you ever wanted to create something simple yet special with your own hands? Building a wooden toy boat is a fun and rewarding project that anyone can try.
Whether you’re a beginner or just looking for a new hobby, this guide will walk you through each step clearly and easily. Imagine the pride you’ll feel watching your handmade boat float on water, knowing you made it yourself. Keep reading, and you’ll discover how to turn basic materials into a charming wooden toy boat in no time.
Your creativity is about to set sail!
Choosing The Right Wood
Choosing the right wood is a crucial step in building a wooden toy boat. The wood you select will determine not only the boat’s appearance but also its durability and safety. As you consider your options, think about the characteristics that matter most to you and your little sailor.
Types Of Wood For Toy Boats
Different types of wood can give your toy boat unique qualities. Pine is a popular choice for beginners because it’s light and easy to work with. However, it may not be as durable as other options.
For a sturdier construction, you might opt for hardwoods like oak or maple. These woods offer strength and longevity, though they can be harder to shape. Baltic birch plywood is another option, known for its smooth finish and resistance to warping.
Consider what you value most: ease of crafting or longevity? This decision will guide your wood selection. Each type comes with its own quirks and benefits—what’s your priority?
Wood Quality And Safety Tips
Quality matters when it comes to toy boats. You want a material that’s free from splinters and imperfections. Inspect the wood closely before purchasing, looking for smooth surfaces and consistent grain.
Safety is another key aspect. Ensure the wood is free from harmful chemicals or treatments. If you’re uncertain, ask the supplier about the wood’s history and any treatments it may have undergone.
Think about who will be playing with this boat. Is the wood safe for children? If you have any doubts, it’s worth investing time in research to ensure peace of mind.
Credit: www.funbox.com.au
Essential Tools And Materials
Gathering the right tools and materials is the first step to crafting a wooden toy boat you’ll be proud of. Having everything ready keeps your project smooth and helps you avoid frustrating pauses. Plus, the right tools make your work safer and the finished boat sturdier.
Basic Tools Needed
- Wood:Choose softwoods like pine or cedar for easy cutting and shaping.
- Hand saw or jigsaw:Essential for cutting your wood into the boat’s shape.
- Sandpaper:Use different grits to smooth edges and surfaces for a safe finish.
- Wood glue:Holds the pieces together firmly without messy nails.
- Clamps:Keep glued parts tightly pressed while drying.
- Measuring tape and pencil:Mark precise measurements to avoid mistakes.
- Drill or small screwdriver:For adding screws if you want extra durability.
I once skipped using clamps, thinking the glue would hold quickly. The boat fell apart during the first test float. That taught me how crucial a simple clamp can be to keep your project intact while glue dries.
Additional Supplies For Decoration
- Non-toxic paint or wood stain:Add color and protect the wood from water damage.
- Paintbrushes:Different sizes help with detailed work and broad strokes.
- Wood varnish:Gives a shiny finish and extra waterproofing.
- Small decorative items:Think tiny flags, decals, or stickers to personalize your boat.
- String or yarn:Use for rigging or sails if you want a classic look.
Have you thought about how decoration can turn a simple toy into a cherished keepsake? Adding your personal touch makes the project more rewarding and can even teach kids about creativity and patience.
Designing Your Toy Boat
Designing your wooden toy boat is where creativity meets craftsmanship. It sets the foundation for how your boat will look and float. Taking time to plan can save you from costly mistakes and make the building process smoother.
Simple Boat Shapes
Start with basic shapes like rectangles, triangles, or simple curves. These shapes are easier to cut and assemble, especially if you’re new to woodworking. Think about what kind of boat you want—flat-bottomed for stability or a pointed bow for a classic look.
Keep your design practical. A simple hull shape not only looks good but also floats better. Have you noticed how kids often prefer straightforward shapes? Sometimes, less really is more when it comes to toy boats.
Creating A Template
Once you settle on a shape, draw it out on paper or cardboard. This template acts as your guide when cutting the wood. It helps ensure all parts are proportional and fit together well.
Use a pencil to sketch the outline clearly, then cut out the template carefully. Try placing the template on different wood pieces to see which grain and color you like best. This step can make your toy boat truly unique.
Do you have a favorite color or texture of wood? Choosing the right piece before you start cutting can enhance the final look and feel of your boat. Remember, a good template is your blueprint for success.

Credit: www.youtube.com
Cutting And Shaping The Wood
Cutting and shaping the wood is a key stage in building a wooden toy boat. It sets the foundation for the boat’s form and stability. Precise cuts ensure all parts fit well together. Careful shaping helps create smooth curves and a neat design. This process requires attention and the right tools to make clean, safe cuts.
Safe Cutting Techniques
Always wear safety goggles and gloves before cutting wood. Use a stable work surface to prevent slips. Mark the cutting lines clearly with a pencil. Choose the correct saw for the type of cut needed. Cut slowly and steadily along the lines. Keep fingers away from the blade at all times. If using power tools, follow the manufacturer’s safety instructions.
Sanding For Smooth Edges
After cutting, the edges may be rough or splintered. Use sandpaper to smooth these areas carefully. Start with coarse grit to remove large rough spots. Then switch to finer grit for a soft finish. Sand in the direction of the wood grain to avoid scratches. Test the edges by running your fingers over them. Smooth edges ensure safety, especially for children’s toys.
Assembling The Boat Parts
Assembling the boat parts is where your wooden toy boat truly begins to take shape. This stage demands patience and precision to ensure all pieces fit perfectly. You’ll find that the way you join the parts affects not only the boat’s appearance but also its durability and performance in water.
Joining Methods
Choosing the right method to join your wooden parts is crucial. Common options include wood glue, small nails, or screws, each with its strengths. Wood glue offers a clean finish but requires clamping and drying time. Nails provide quick assembly but risk splitting thin wood pieces if not handled carefully.
Try combining glue with tiny finishing nails for extra strength. This combo worked well when I built my first boat, preventing loose joints without visible marks. Have you considered using dowels? They add hidden reinforcement and improve alignment, especially for the hull sections.
- Wood glue for seamless, strong bonds
- Small nails or brads for immediate hold
- Dowels for hidden, precise joints
Ensuring Stability
Stability ensures your toy boat won’t fall apart during play or float unevenly. Focus on reinforcing key stress points like the keel and the joints between the hull and deck. Adding small triangular braces inside corners can significantly increase rigidity without adding bulk.
Don’t overlook sanding edges smooth before assembly. Rough edges can create gaps that weaken the structure. Ask yourself: is each joint tight enough to handle some pressure without wobbling? Testing this early saves frustration later.
- Reinforce high-stress joints with braces
- Sand edges for a snug fit
- Check for tightness before final drying

Credit: www.youtube.com
Painting And Finishing Touches
Painting and finishing touches bring your wooden toy boat to life. This stage is where creativity meets safety and durability. It’s not just about making the boat look good; it’s about protecting the wood and ensuring it’s safe for handling, especially if children will play with it.
Choosing Safe Paints
Not all paints are created equal, especially for toys. You want to pick paints that are non-toxic and safe for kids. Look for labels that say “child-safe” or “non-toxic.”
Water-based acrylic paints are a great choice. They dry fast and have less odor, which makes your workspace more pleasant. Plus, they clean up easily with soap and water.
Have you ever used spray paint indoors and regretted it? Avoid those fumes by sticking with brushes and water-based options. Your health and your boat’s finish will thank you.
Adding Details And Decorations
Details make your toy boat unique. You can paint stripes, windows, or the boat’s name using fine brushes. Small stickers or decals also add charm without much effort.
Try using waterproof markers for tiny accents or outlines—they give you more control than a brush. Adding a little sail made from fabric or paper can turn your boat into a mini masterpiece.
Think about the story your boat tells. What colors and patterns reflect its personality? Your finishing touches will transform it from a simple craft to a treasured keepsake.
Waterproofing And Testing
Waterproofing and testing are vital steps in building a wooden toy boat. These processes protect the boat from water damage and ensure it floats well. Proper waterproofing extends the boat’s life. Testing checks the boat’s balance and performance on water.
Applying Sealants
Choose a non-toxic, waterproof sealant safe for toys. Use a paintbrush to apply the sealant evenly on the boat’s surface. Cover all wooden parts, including edges and joints. Allow the first coat to dry completely. Apply a second coat for better protection. Let the sealant cure fully before testing the boat in water.
Floating And Stability Tests
Place the boat gently in a basin filled with water. Check if it floats without tipping over. Observe if the boat sits evenly on the water surface. Add small weights inside to test stability. Adjust the weight distribution if the boat leans or tips. Repeat the test until the boat floats steady and balanced.
Tips For Perfect Craftsmanship
Crafting a wooden toy boat requires focus and care. Small details shape the final look and function. Follow these tips for smooth, clean results. Proper craftsmanship makes the toy safe and long-lasting.
Common Mistakes To Avoid
- Using rough wood can cause splinters and uneven surfaces.
- Skipping sanding leads to a rough finish and poor paint adherence.
- Cutting without measuring causes parts to not fit well.
- Applying too much glue creates mess and weak joints.
- Ignoring drying time results in weak bonds and paint defects.
Enhancing Durability
Choose hardwood or quality plywood for strength. Seal the wood with waterproof paint or varnish. Use non-toxic finishes safe for children. Apply at least two coats for better protection. Allow each coat to dry completely before the next. Attach parts firmly using wood glue and small nails. Sand edges smooth to prevent cracks and chips.
Frequently Asked Questions
What Materials Are Needed To Build A Wooden Toy Boat?
You need wood planks, waterproof glue, sandpaper, paint, and small nails. Choose lightweight, durable wood like pine for easy shaping and lasting use.
How Do You Ensure The Wooden Toy Boat Floats Well?
Use waterproof glue and seal the wood with marine varnish. Keep the boat’s design balanced and avoid heavy decorations to maintain buoyancy.
What Tools Are Essential For Making A Wooden Toy Boat?
Basic tools include a saw, hammer, paintbrush, clamps, and a drill. These tools help cut, assemble, and finish the boat efficiently and safely.
How Long Does It Take To Build A Wooden Toy Boat?
Building usually takes 2 to 4 hours depending on skill level. Drying time for glue and paint may add extra hours for best results.
Conclusion
Building a wooden toy boat can be fun and rewarding. Each step teaches patience and creativity. You get to see your work float on water. Simple tools and materials make the project easy. Kids and adults both enjoy this hands-on activity.
Keep practicing to improve your skills. Soon, you’ll build boats with more details. Remember, the joy is in making, not just finishing. Try different designs and colors next time. Enjoy your wooden toy boat adventures!




