Are you ready to create a special place where your toy cars can rest and shine? Building a toy car garage is easier than you think, and it’s a fun project you can enjoy step by step.
Imagine having a cool garage that keeps your favorite cars organized and adds a touch of style to your playroom. In this guide, you’ll discover simple tips and tricks to build your own toy car garage quickly, even if you’ve never done a project like this before.
Let’s get started and bring your toy car collection to life!

Credit: www.amazon.com
Materials Needed
Gather wooden boards, nails, glue, paint, and small tools before starting. Simple materials make building the toy car garage easy and fun.
Building a toy car garage is an exciting project that can ignite creativity and provide endless hours of fun. Before you dive into construction, gathering the right materials is crucial for a seamless and enjoyable process. Let’s explore the key components you need to bring your toy car garage to life.Basic Tools
To kick off your project, ensure you have the essential tools at hand. A simple toolkit might include a hammer, screwdriver, and measuring tape. These tools will help you assemble and adjust components accurately. A small electric drill can be handy for any intricate work or to speed up the process. Don’t forget safety gear like gloves and goggles to protect yourself while working.Building Supplies
Choosing the right building supplies is the backbone of your toy car garage. Start with sturdy materials like plywood or MDF for the structure. These are easy to cut and assemble, and they offer durability. You’ll also need nails, screws, and wood glue to secure the pieces together. Consider using hinges if you plan to add doors that open and close, enhancing the garage’s functionality. For a smooth finish, sandpaper will help you smooth out any rough edges. A coat of paint or varnish can protect the wood and add a polished look.Decorative Items
Once the basic structure is complete, it’s time to get creative with decorative items. Think about what will make your garage unique and appealing. Paints in vibrant colors can transform the look and feel of the garage. Stickers or decals can add personality and mimic real garage signs or logos. You might include miniature plants or toy figures to create a lively atmosphere. Adding small LED lights can bring the garage to life, especially during playtime. Consider how you can incorporate these elements to ignite your child’s imagination. What unique features will your toy car garage have?Choosing The Design
Choosing the design for a toy car garage shapes how it looks and works. The design affects the space for cars and the play experience. It also sets the style and complexity of the build. A clear design plan helps create a fun and functional garage.
Simple Garage Shapes
Start with basic shapes for an easy build. Rectangles and squares work well. They give enough room for toy cars. Triangles and arches add style without much effort. Simple shapes make cutting and assembling faster. Choose a shape that matches your tools and skills.
Size Considerations
Think about how many cars the garage will hold. Measure the size of the toy cars first. Leave extra space for easy parking and moving. Consider the room where the garage will stay. Too big might take too much space. Too small could feel cramped and less fun.
Customization Ideas
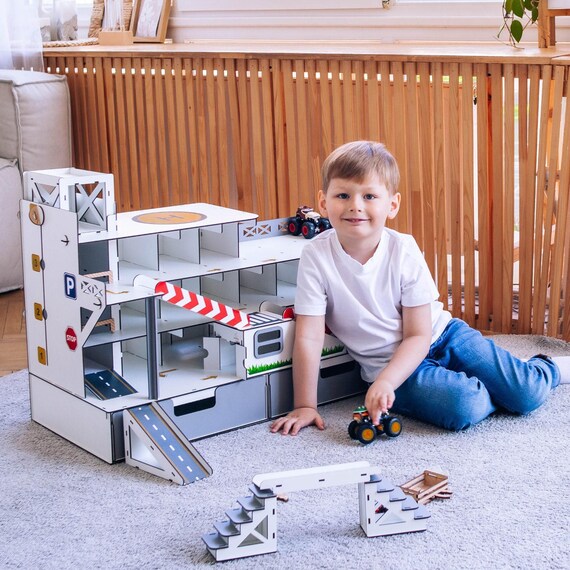
Personalize the garage to make it unique. Add shelves or ramps for extra play options. Paint it in bright colors or with cool patterns. Use stickers or decals of car brands. Add doors that open and close for realism. Small details make the garage special and engaging.
Preparing The Workspace
Preparing your workspace is a crucial part of building a toy car garage. A well-organized and safe area helps you focus on the project without distractions or accidents. It also makes the process smoother and more enjoyable.
Safe Area Setup
Choose a space that is clean and free from clutter. Make sure it has good lighting so you can see small parts clearly. Avoid areas with heavy foot traffic to prevent accidents or losing tiny pieces.
Clear the surface where you’ll work and cover it with a protective layer like newspaper or a plastic sheet. This prevents damage to your furniture and makes cleanup easier. Also, keep a first aid kit nearby just in case you deal with sharp tools.
Have you checked if your workspace has enough ventilation? This is important if you plan to use glue or paint. Safety goggles and gloves can protect your eyes and hands, so keep them within reach.
Organizing Materials
Gather all your tools and materials before you start. Sort them into groups like screws, wood pieces, paints, and brushes. This saves you from hunting for items mid-project.
Use small containers or trays to hold tiny parts. Label these containers if possible, so you don’t mix things up. Keeping your materials organized helps maintain your focus and speeds up your work.
Think about the order you’ll need your tools. Place the most-used ones closest to you. This simple step reduces interruptions and keeps your workflow steady.

Credit: www.etsy.com
Step-by-step Assembly
Assembling a toy car garage is both fun and rewarding. Breaking down the process into clear steps helps you stay organized and ensures your garage turns out sturdy and functional. You’ll enjoy seeing your project take shape piece by piece.
Building The Base
Start with a flat, solid base to give your garage stability. Use a piece of wood, sturdy cardboard, or foam board cut to your desired size. Make sure the base is large enough to fit all your toy cars comfortably.
Attach the base securely to your working surface or add small rubber feet underneath to keep it from sliding. A well-built base prevents wobbling and makes the entire garage feel more professional.
Constructing Walls
Next, create the walls using lightweight wood, cardboard, or plastic sheets. Cut each wall to match the height and length you want for your garage. Remember, precision in cutting makes assembly easier and the final product stronger.
Use wood glue or strong tape to fix the walls to the base, ensuring they stand straight. Reinforce corners with small brackets or extra glue to avoid any wobble. Have you noticed how solid walls instantly make the structure feel more like a real garage?
Adding The Roof
Choose a roof style that fits your design—flat, sloped, or even a two-sided peaked roof. Cut the roofing material to size, keeping in mind overhangs that protect the walls. If you want extra flair, add a small chimney or skylight.
Attach the roof carefully using hinges if you want it to open, or glue it down for a permanent cover. Consider painting or decorating the roof to give your garage personality. How could adding a removable roof improve playtime?
Creating Garage Doors
Garage doors bring your toy car garage to life. Cut door panels from thin wood or sturdy cardboard. You can make them slide open, swing out, or lift up with simple hinges or tracks.
Attach handles made from small knobs or buttons for easy opening. Paint or decorate the doors to match the rest of your garage. Think about how functional doors add realism and excitement to your toy setup.
Painting And Decorating
Painting and decorating your toy car garage brings it to life. This step lets you personalize the garage and make it fun. Careful choices in colors and decorations can make the garage look real and exciting. Protecting the paint with a seal keeps it looking great for longer.
Choosing Colors
Pick colors that match the style of the garage. Bright colors like red, blue, or yellow catch the eye. Soft colors give a calm, clean look. Use a mix of colors for details like doors and windows.
- Use water-based paints for easy cleanup and safety.
- Test colors on a small area first.
- Let each color dry before adding another.
Adding Stickers And Details
Stickers add personality and fun to the garage. Choose car-themed or road signs stickers to keep the theme. Hand-paint small details like numbers or signs for a unique touch.
- Apply stickers on a smooth, dry surface.
- Use fine brushes for detailed painting.
- Keep decorations simple and neat for a clean look.
Sealing For Durability
Seal the garage to protect paint and decorations from wear. A clear sealant keeps colors bright and prevents scratches. Choose a non-toxic, water-based sealant for safety.
- Apply sealant in thin, even coats.
- Allow full drying between coats.
- Seal both inside and outside surfaces for full protection.
Storage Tips
Keeping your toy car garage tidy makes playtime more fun and cleanup easier. Smart storage helps you find the right car quickly and keeps your garage looking neat. Let’s look at ways to organize your toy cars and make the most of the space you have.
Organizing Toy Cars
Sort your toy cars by size, color, or type to create a system that works for you. Use small bins or trays to group similar cars together—this saves time and reduces clutter.
- Label each bin or section so your child knows where to put cars back.
- Keep frequently played-with cars at eye level for easy access.
- Use clear containers so you can spot your favorite cars without opening every box.
Have you noticed how much easier it is to keep toys tidy when everything has its own place? That’s the magic of good organization.
Maximizing Space
Use vertical space by adding shelves or stacking containers. This helps you store more cars without making the garage bulky or cluttered.
- Attach pegboards to the walls for hanging tools or accessories.
- Use drawer dividers to keep small cars from rolling around.
- Consider multi-level racks or ramps inside the garage to store cars on different levels.
Have you tried turning unused corners or under-the-table space into storage? These hidden spots can hold extra cars or supplies without crowding the play area.
Safety Tips For Kids
Building a toy car garage with your kids can be a fun and rewarding project. However, safety should always come first to make sure everyone enjoys the process without accidents. Paying attention to simple safety tips can prevent injuries and keep the experience positive for both you and your children.
Handling Tools Safely
Teach your kids to use each tool only for its intended purpose. Show them how to hold tools like screwdrivers and hammers firmly but carefully to avoid slips.
Always choose age-appropriate tools. For example, plastic or blunt-edged tools work better for younger children, while older kids can handle real tools under supervision.
Keep a clean workspace to prevent tripping over scattered tools or materials. This habit also helps your kids learn responsibility for their work area.
Supervision Guidelines
Never leave your kids unattended while they’re working with tools or small parts. Close supervision helps you catch mistakes before they cause harm.
Stay close enough to guide their movements and correct unsafe behavior immediately. Ask questions like, “Does this tool feel comfortable in your hand?” to encourage awareness.
Set clear rules before starting the project, such as no running with tools or always wearing safety goggles. Consistency in enforcing these rules builds good habits quickly.
Credit: www.etsy.com
Encouraging Creativity
Building a toy car garage offers a perfect chance to encourage creativity in children. It goes beyond just assembling parts. The process allows kids to explore ideas and make choices. This sparks imagination and develops problem-solving skills. A creative space invites children to express themselves freely. It becomes a fun activity that grows their confidence and thinking abilities.
Personalizing The Garage
Let children add their personal touch to the garage. They can choose colors, stickers, or decorations. Drawing signs or painting walls makes the garage unique. Allowing kids to decide the layout boosts ownership. Personalization creates a special connection to the toy. It motivates kids to care for and enjoy the garage more.
Incorporating Play Elements
Include playful features to make the garage exciting. Think about ramps, car lifts, or small tools for pretend repairs. Use simple materials like cardboard or blocks to build extras. Adding interactive parts invites children to invent new games. Play elements keep the garage lively and fun. This encourages kids to use their imagination every time they play.
Frequently Asked Questions
What Materials Do I Need To Build A Toy Car Garage?
You need wood or cardboard, paint, glue, screws, and small tools. These materials are affordable and easy to work with for beginners.
How Long Does It Take To Build A Toy Car Garage?
It usually takes 2 to 4 hours, depending on your design complexity. Simple garages take less time, while detailed ones require more effort.
Can Kids Safely Help Build The Toy Car Garage?
Yes, kids can help with painting and assembling under adult supervision. It’s a great way to encourage creativity and teamwork.
How To Customize A Toy Car Garage For Different Car Sizes?
Measure your toy cars first, then adjust garage dimensions accordingly. Add ramps or multiple levels for more storage and play options.
Conclusion
Building a toy car garage can be fun and rewarding. You only need simple materials and some patience. Follow each step carefully to create a sturdy structure. Kids will enjoy organizing their cars and playing more. This project also helps develop creativity and hands-on skills.
Don’t rush; take your time to make it neat. Soon, you will have a cool garage for toy cars. Try different designs to find what works best. Enjoy the process and the smiles it brings!




